Friday, December 28, 2012

Sushi Roll Scarf - Crochet Pattern!

I've done a lot of crocheting in the last couple of months but haven't gotten a chance to upload pictures and post them to show you all what I've done.  So now that both my daughters are napping I thought I should use this time to do some posts.

I while back while I was browsing the web I found this Free pattern on Ravelry.  The pattern was for a very simple scarf with different colors and when you roll up your scarf you would end up with a sushi roll.  Now how cute is that?  All you really need to know is how to double crochet.  

I love the scarf!  It was fast and simple to make.  Now I have something to use for the winter!

Thanks to Mermaiden for sharing this cute pattern.  Anyone interested in making one please click on the link below.


Crochet/Amigurumi Female Version of Bullseye from Toy's Story!

My daughters has been fighting over my crochet dolls I've been making them recently. There was just so much screaming and yelling one night when they were fighting over a teddy bear.  So I told my oldest to just let her little sister play with it first and I'll promise I'll make her another one.  She finally gave in and let her little sister play with the doll first.

So to keep my promise I wanted to make something for her to open on Christmas day.  I've browsed the web and finally found something very cute and was very excited to make.  This amigurumi was the house from the movie Toy Story.

I didn't have the correct color yarn for felt but that didn't stop me from making it.  So I decided to make a female version of Bullseye.  I used hot pick for the hair and hoofs.  And purple color for the body.  I thought it turned out pretty good.  It took me two nights to make.  My daughter loves it!!


Thanks April for posting this pattern for me to use.  If anyone is interested in this pattern please click on this link below.  Remember April is giving this pattern out for personal use only.  So do not sell pattern or the finished product.  And of course give her credit for it if you decide to post pictures online.

http://aprildraven.blogspot.com/2011/01/brown-pony.html?m=1

Any other cool patterns out there you think I should use?  Please comment and let me know!!  I've been addicted to crocheting.  So much fun!!

Wednesday, December 5, 2012

Crochet Child Leg Warmers

My youngest pants don't seem to want to stay down to cover her legs. The weather is getting so cold that I decided to make her some leg warmers to keep her legs warm. I found this pattern on Pinterest and it seemed easy enough to make so I gave it a try. As you know I'm just a beginner so the two leg warmers aren't identical.One is wider than the other but the difference is so small that you can't really tell. I believe they turned out pretty cute. And the most important thing is that my daughter LOVES them. This was an easy project so it took me a couple of hours to make (two nights before bed while watching TV).


Here's the link to the pattern I've used. Thanks for sharing this pattern Danyal!!


http://www.crazysockscrochet.blogspot.com/2010/06/crochet-pattern-baby-legwarmers.html

Anyone tried this pattern or made other leg warmers? Please share!

 
My other loves them so much she use them as arm warmers because they don't fit her legs.  LOL!  My kids are just too funny!

DIY Christmas Wreaths

We have a Christmas tree but that's about it for Christmas decorations around my house. So this year I wanted a Christmas wreath. I've been shopping around. They all range from $20 plus dollars. And the cheap wreaths are just plain wreaths with a bow tied to it. So I was thinking...I can make one myself.

I couldn't decide what kind of wreaths I wanted. A more modern looking wreath or a more natural looking wreath. I've been visiting my local crafts store multiple times and came out empty handed. I'm not sure why it’s so hard for me to just make something. Maybe I'm just not the creative type.

Well I finally went for it this weekend and I actually made two.

The first wreath I made was a yarn felt wreath. I've actually used a picture I've found on Pinterest to make this wreath.  Sorry I do not have the actually link where I found this picture.  I purchased a form tube froma Home Depot. I was there one morning for the Kid's Workshop. For those who don't know about this kid’s workshop and have kids please see below. My daughter loves these workshops and we look forward in going every month.

From the Home Depot Website (http://www.homedepot.com/webapp/catalog/servlet/ContentView?pn=HT_WS_KidsWorkshops):

• FREE hands-on workshops designed for children ages 5 - 12 offered the 1st Saturday of
every month at all The Home Depot stores between 9:00 a.m. – 12:00 p.m.
• Workshops teach children do-it-yourself skills, tool safety and instill a sense of pride
and accomplishment.
• All kids get to keep their craft and receive a FREE Kids Workshop Apron,commemorative
pin and certificate of achievement.


Well that tube cost me $1.18 I believe. I had the yarn and felt already at home.

Here are the steps.

1) I cut the tube to a size I wanted. And I taped the ends together. (Note:Hot glue does not work so don't bother with it)


2) Wrap the yarn you picked around the whole form tube you've just connected.


3) Wrap other colors around the wreath. Just to add some color to it. You can choose to skip this step if you want.


4) Made felt flowers. I've just cut strips of felt, hot glued the edges together, cut one end of the strip that's not glued, and rolled up the strip into a flower. Glue to the flower together and secure it onto the wreath.


I had limited color felt so I went back to my craft store (Michael's) and purchase a couple more. I brought three more 9x12 felt for 29 cents each. I'vealso wanted to add more to the wreath and purchased some berries for 51 cents and 79 cents and mini pine cones for $2.49. And a gold ribbon from Target for $3.

5) I've cut up the berries and glued it onto my wreath. I've also placed acouple of pinecones and cinnamon sticks (that also came with the package) onto my wreath.

6) Last step was adding the ribbon so it would hang on the wreath hook whichI've also purchased at a Target for under $2.

I loved it. It was very easy to make. Something I would do different next time is buying a real form wreath next time. I was cheap and got a flexible one at Home Depot so the wreath doesn't stay a circular shape. Oh well...Too lateto do anything now. So this wreath cost me around $6. And I had tons of things left over I could use for my next project too.


My second wreath was a more natural looking one. All the items for this wreath I've also purchased at a Michael's craft store.

Pearl berries for 79 cents
Gold poinsettias for $3.99
24" wreath for $3.99
Red Berries for 79 cents.

Since the poinsettias had lots of glitter I made sure I setup scrap paper to make clean up easier.


So here are the steps...

1) Cut up the flowers, berries into small pieces.

2) Place the flowers and berries around the wreath to your liking.


3) Hot glue everything together.

And you're done. This was much easier to make. I've also like the out come to it too. This wreath would be a $30-50 wreath if you were to buy it. I could have saved more if I had coupons. But of course I did not plan my trips to the craft stores so I couldn't use any of them. I could have saved an extra 20% off my whole purchase....oh well.

 
This was so much fun. I might make some more next year. Anyone making their own wreaths this year? Let me know how they turn out.

Forgot to mention...Please check out my other blog where I've posted past pictures of Home Depot Kid's Projects.... http://www.babyatplay.com/2012/09/06/free-kids-workshops-to-learn-create-craft-at-the-home-depot/

Wednesday, November 28, 2012

Crochet Panda Ornament

Christmas is just around the cornner and I want to make something to remember this year by.  And since I started doing a lot of crocheting I decided to make a crochet ornament.  I was browsing the web and found these cute ornament patterns.

This site you'll find three different patterns.  The patterns are for a bear, a panda, and a korla ornament.
http://allaboutami.tumblr.com/post/13968569776/teddyornamentspattern

The patterns are very simple to follow.  And these are just so fun to make.  I've finished the panda and is thinking of doing the other two soon.


Wednesday, October 31, 2012

Happy Halloween Everyone!!


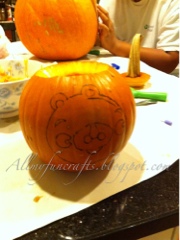
I just found out I cannot crave pumpkins. My husband and I each had a pumpkin to crave this year. This was my first year craving one. I decided to pick the Green Pig for the Angry Birds. What a disaster. By the time I finished it was falling apart. :(

My husband on the other hand cut out Minnie Mouse. It's my daughter's favorite character this year. It turned out great. What do you guys think?


Happy Halloween Everyone!  Be safe and hope everyone gets lots of candy!!

Sushi Anyone?? Crochet Sushi!!


I've been craving sushi. And since I was not able to go get some to eat...I decided to go and make some...to play though. I found simple patterns online to make this cute sushi. You can find them here: Http://shellatin.blogspot.com/2010/06/sushi-pattern.html. Thanks for sharing these cute pattern Michelle. Her patterns were very simple to follow. She has patterns to make the Egg Sushi, the Shrimp Sushi, the Salmon Sushi, the California Roll, Wasabi, Pickled Ginger, and just the standard Sushi.
 
 
As you can see below I haven't gotten a chance to crochet all her patterns yet. I only made the Standard Sushi, the California Roll, and the Egg Sushi. And with the takeout sushi boxes I saved it just made it look extra cute! My daughter loved it. She uses it to play restaurant and use it to practice her chopstick skills on it.


Anyone tried these patterns yet? Let me know how they turn out? Or are there other sushi patterns out there that you have for me to try? Please let me know!


Sunday, October 28, 2012

Amigurumi Toys in Pajamas (Bear) with Baby Bear and Baby Kaola


I've completed three more Amigurumis! I used this booked called, Amigurumi Two!" by Ana Paula Rimoli. Again, it's part of the Pajama dolls set. As you know I've previously crochet a Rabbit in Pajamas http://allmyfuncrafts.blogspot.com/2012/10/bunny.html. So now I’m missing the baby rabbit and the big Koala doll. I'm not sure if I want to make those though. We will see how my mood feels like.

The small dolls took 1-2 nights to complete. The big one took me a little over a week. Of course I don't crochet throughout the day. I only have a little time while my kid’s takes their naps and a little time during the night before I sleep.

 
Aren't they cute!  They are soo easy to make.  And also very fun!  And for the baby dolls...I added my own touch...I added little hairs sticking out. 


I love this book.  So I requested the first book that came out, Amigurumi World Seriously Cute Crochet, from the library.  I can't wait until I get a hold on this book. 
 
Anyone have this book?  What do you guys all think about it?

Sunday, October 21, 2012

A Child Crochet Pumpkin Hat with Ear Flaps

I found this cute hat on YouTube and I had to make it.
I first used this link http://www.youtube.com/watch?v=0LiHzPsuWS0.  After crocheting almost half of it I noticed it was way too small for my youngest daughter. As you know...I'm just a beginner...so it took me a while to notice it. So I had to unravel almost all of it and start over. I kept added more stiches to it. I kept measuring my daughters head until I got the size I liked. After I finished the hat I wanted to add some ear flaps. And I noticed there's another video out there teaching people how to make it with the flaps - http://www.youtube.com/watch?v=8-Yxf0QiQco. It also teaches you how to increase the size of the hat. I wished I had seen that video first...that way I wouldn't had wasted all that time crocheting all those rolls and having to unravel it.  Oh well...


Well here's the two links I used below. I think it was a great experience for me. And I think the hat looked great. I added two tone braids too. I think it's just too cute. I had actually gotten many complements when my daughter had worn it out. Thanks Crochet Geek for providing these wonderful YouTube videos.
Pumpkin Spice Jr - Child Crochet Pumpkin Hat
 
Crochet Geek: Crochet Cable Hat with Ear Flaps - Pumpkin Crochet Cap
 
If you plan to make a hat for an older child or for an adult you might want to skip the first link and use the second.
Anyone else out there had made this hat? How was it? Easy? Please let me know your experiences. And let me know what other good projects are out that I should try making too.

Thursday, October 18, 2012

Easy Pumpkin Amigurumi Crochet Project


I wanted to get into the holiday/season sprit. So I made a pumpkin hat for one of my daughters (which I would post later) and little pumpkins. As you know that I'm a beginner so I prefer to something visual to show me how to make things. So of course I used YouTube. I've been watching Bobwilson123 videos...her videos are great. She goes slowly and shows you everything step by step.

Here are the pumpkins I've made. I should have put a face on them...that would have been cute. Oh well...maybe I'll make another one later.


Aren't they cute? They were extremely easy to make. And did I mention they were quick to complete too? So go and start making them!

Check out her video below:
http://www.youtube.com/watch?v=DmUO1dDB8qA&feature=results_video


They fit on the palm of your hands.
 
And for the free written pattern please click on this link below. I believe Alexandria S. had created this pattern. Thanks! It was fun to make. - http://www.ravelry.com/patterns/library/crochet-pumpkin-amigurumi

Friday, October 12, 2012

Amigurumi Toys in Pajamas (Rabbit)

Since I had so much fun making that Totoro I decided to make another amigurumi.  I borrowed this book from my local library and found some great patterns for the cutest dolls.  My first project from that book is this rabbit.

 
The book I got this pattern from is called, "Amigurumi Two!" by Ana Paula Rimoli.  It's a great book with cute pictures and simple directions.  I'm a beginner at crocheting and I had no problems following her instructions.  This particular pattern comes with instructions to make a big and a small toy.  There's three different animals patterns, a rabbit, a bear, and a koala. 
 
So this big rabbit is approximately 9 inches.  My daughter LOVES this doll and she started sleeping with her every night now.  She named her Juna.  How cute!
 
This was a very simple project and it took me less a week to make. 
 
Look, Totoro now has a friend.  :)
 
 
My next project is the Bear in Pajamas.  I already made a little bear for it already.  So once I purchase more safety eyes I will make a baby rabbit to keep my big rabbit company too. 

Thursday, October 11, 2012

My First Amigurumi - Big Grey Totoro!

I've recently just gotten into crocheting. And I'm surprise how addicting it is. Some of my first crochet projects were hats, scarfs, and hand warmers. I will post pictures of these in a later post. So I wanted to try something different. I have over three crochet hats and other winter items. I wanted to make something cute and fun. And luckily I found a FREE pattern to crochet this adorable Totoro. One of my favorite anime characters ever!

Amigurumi is a knitted stuff toy. It's the Japanese art of knitting or crocheting small stuffed animals and creatures.

I found this FREE pattern on http://www.ravelry.com/. They have tons of ideas and patterns. Some cost money and some are free. All you have to do is become a member. There's knitting projects too.


So I used the pattern from Lucy Ravenscar. Once you become a member you can search for this project under Totoro or by her name. You can also try to get in with this link http://www.ravelry.com/patterns/library/grey-totoro-amigurumi. She's nice enough to share this pattern so please do not sell this pattern and if you plan to sell the doll please give her credit.

All that I needed to make this Totoro was grey/cream/white/black yarn, Stuffing, safety eyes, tapestry needle, and a 3.5mm hook (US E hook).


It took me longer to make this amigurumi because I didn't have all the materials. So make sure you have everything before you start.

The finished size is approximately 9” tall. Mine didn't turn out looking like the one Lucy made but I think it is still very cute. And my daughter LOVES it.


Go ahead and try this pattern and please let me know how it turns out.

And can you believe it? I'm a beginner at this and I was able to make this. I'm so proud of myself.
I've just finished making another Amigurumi...again, I will post this up at a later time to share with all of you.